Contents
- Index
Repository Set-up Dialog and Mode
Repository Mode
As an alternative to classifying documents one at a time, the repository gives you a place to scan or add your unorganized document to a staging area. Think of this staging area as a "virtual" in-box for the many different sources where documents flow into your organization. You can create as many of these repositories as you need and they can be named differently per each Docs2Manage (D2M) installation. This idea lends itself to high-speed document scanners that can scan many pages at one time and digitally organized at a later time.
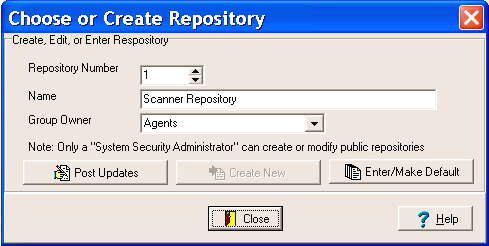
Repository Set-up Dialog

To create a new repository:
1. From the File menu, select Repository Set-up.
2. Find a Repository Number where the name is indicated as "** New Repository **".
3. Rename the repository Name to something meaningful to you (e.g., "Personal" or "Business").
4. Select a Group Owner. This field is only active to the System Security Administrator (SSA) and indicates to which security group the repository belongs. The SSA is the only role that can create or modify Public repositories (repositories which can be viewed by anyone in Repository Mode).
5. Click the Create New button.
Once a repository is created, you can rename a repository in the Repository Set-up Dialog by changing the name text click the Post Updates button.
WARNING: Although it is possible to use a different storage type and location for each security group, it is highly recommended to keep the storage type and location the same for all groups. If you elect to have different storage types or locations in a single database, you will not be able to view other repositories that have a different storage type or location even though you may have right to those repositories in other groups. Also, avoid switching an existing repositories from one group to another if they have different storage types or locations. These conditions and warnings do not apply if you use the same storage type and location for all groups.
NOTE: Repository names are stored on each machine, so they can be named whatever you like. Other D2M users will not see this name, but can view the contents of the repository. If someone stumbles onto a repository that does not have a name on that computer, the name will be seen as "*** Unknown Repository ***".
You can create up to 999 different repositories.
Entering a Repository
To enter a repository, click the Enter/Make Default button. Selecting a default repository allows you to automatically enter that default repository when you select Repository Mode under the File menu.
Using Repository Mode
Once you have entered Repository Mode, the main form's caption will indicate that you are in Repository Mode. This mode is just like using D2M in regular mode, but you can add as many unrelated documents as you want to the selected repository record with the intention of moving those documents out of the repository to new documents at a later time. This means if you have a document scanner with an Automatic Document Feeder (ADF), you can load and scan all your varying documents at one time without needing to stop the scanning process to change or create the next D2M document information record.
Once you are ready to organize the repository pages, you can move selected document pages to a single document or move many pages into many single page documents. This can only be done from repositories that are considered active (your current security group / shown in blue). The Documents Page Grid View has a pop-up menu to make document page selections and options to transfer pages to new documents. This process is described in detail in the Repository Page Pop Up Menu) section. If the documents you desire to classify are in a public repository (shown in red) or in a different group (shown in black), you must first move those pages you desire to classify to an active repository, as described below.
Moving Documents from One Repository to Another
Once in repository mode, all the active repositories are displayed in a tree view on the left side of the screen. The number next to the repository name indicates how many pages are in each repository. The Document Pages / Files section in the upper right corner displays thumbnails of the pages. You may switch to a Grid View by right-clicking the mouse. Pages in the tree view or Thumbnail/Grid View can be selected, dragged, and dropped into another repository on the tree. Please read the Workflow & Repository Tree View about this topic. ..
