Contents
- Index
Page Image Preview Pop-up Menu
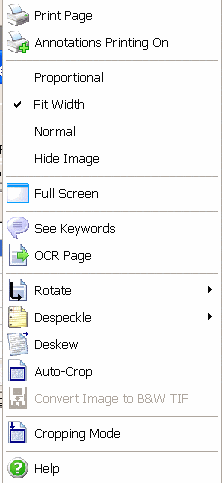
On the Documents Page form, right-click on the Page Image Preview area to display the pop-up menu.

In menu order, menu item definitions are as follows:
Print Page
This prints the current page in Page Image Preview (right-click the Thumbnail (or Grid) View area to see a menu option to print multiple pages).
Annotations Printing On
This option when checked tells D2M to include any Annotations when printing pages.
Proportional
This displays the entire image in Page Image Preview. This may make the page hard to read.
Fit Width
This fits the width of the image in Page Image Preview. You may have to use the vertical scroll bar to see the bottom of the page.
Normal
This displays the image as-is in Page Image Preview. If the image size is large, you may only be able to see a small section of the page at one time.
Hide Image
This does not display the image in Page Image Preview (instead, text regarding "Hide mode" is displayed). This is useful when the stored images are very large. This allows you to scroll through each page without loading each page, one by one. Once you find the page you want to see, choose Proportional, Fit Width, or Normal from this menu to display the page.
Full Screen (and entry into Annotations Mode)
This displays the image using the full-screen. Please read Image Full-screen Preview / Annotations Mode about the available features in that area, including Annotations. You can also double-click the image area to enter full-screen mode.
See Keywords
This shows the keywords tied to the current page. Use the OCR Page from this menu to fill in this form with keywords derived from the OCR results. Keywords can also be manually entered or changed.
OCR Page
This OCRs the current page. If Auto-rotate is on, pages will be rotated as needed to find the best OCR results.
Rotate
This allows you to rotate the current image in Page Image Preview. Rotate pages right, left, or upside-down (right-click the thumbnail/grid area to see a menu option to rotate a multiple pages).
Despeckle (B&W Tiff only)
This allows you to despeckle the current image in Page Image Preview. You have a choice of 1, 2, or 3 pixel despeckle, which is explained more in the Scanning Options section (right-click the thumbnail/grid area to see a menu option to despeckle multiple pages).
Deskew (B&W Tiff only)
This allows you to deskew the current image in Page Image Preview. Deskewing attempts to straighten all pages that are at a slight angle.
WARNING: This option may have undesirable effects on images when it can not determine how to straighten them because of a lack of lines or margins. Therefore, it is recommended you do this one image at a time, where you can still cancel if the deskew fails to work properly. Right-click the thumbnail/grid area to see a menu option to deskew multiple pages.
Auto-Crop (B&W Tiff only)
This attempts to determine where the edge of a document image is and eliminates the white space outside that region. This option maybe very useful when images like bank checks were scanned and you want to eliminate the unneeded white space.
WARNING: Be careful using this option, as it may cut-off more than you desire if the page does not have well defined borders. If you do not like the result of the auto-crop operation, cancel the change by clicking the Cancel button in the Document Image Data Navigator.
Convert Image to B&W Tiff
This option is for users who may elect to convert the current image from Jpeg or PNG to the much more efficient B&W Tiff format (right-click the thumbnail/grid area to see a menu option to convert multiple pages).
Cropping Mode
This option allows you to select a rectangular area and eliminate the area outside the rectangle (cropping). When you finish selecting an area, you will be asked if you want to crop this area. If you do not like the cropping result, cancel the change by clicking the Cancel button in the Document Image Data Navigator.
WARNING: Cropping Mode remains active until you click the menu option again.
Help
This help section is displayed. ...
