Contents
- Index
Setting up a Web Server
General Setting on Any Web Server
Notes about IP Addresses and Server Ports - How public am I?
IP Address (TCP/IP Address)- This is a unique number assigned to any device, computer, or web server on the Internet. It is four groups of numbers ranging from 0 to 255 separated by periods like "192.168.1.13". IP Addresses that begin with:
10.0.0.0 - 10.255.255.25
172.16.0.0 - 172.31.255.255
192.168.0.0 - 192.168.255.255
are reserved IP Address ranges reserved for Local Area Networks (LAN or Intranet). The IP Address 127.0.0.0 is also reserved as the localhost IP address, which is the address to use when testing a website or web application on your own computer only. All other IP addresses outside these ranges are considered to be used by the Internet. That localhost IP address (127.0.0.1) is the address that Docs2Web is configured to use by default. This means that Docs2Web can only be tested on the computer where it is installed. Docs2Web can be tested on your Intranet or on the Internet by changing the IP address used by the web server and the Docs2Web application. On a company network, obtain your company IP Address by going to the command prompt and typing "ipconfig" or contact your Network Administrator. To obtain your External IP (Internet) address, open your browser and visit a website like www.whatismyip.com. Please ask your network administrator about setting up your Docs2Web application on the Internet. Besides the IP Address, the port is the part of the IP Address where website content will be directed. Typically HTTP always uses port 80 and HTTPS uses port 443. If another port is used, your web server will need to be configured to use that different port. You will also have to tell your browser of the different port used by including a ":" and port number after the IP Address or domain name used. The Docs2Web Trial is configured to use port 6789. This was done to not interfere with any other web servers that may already be running on that machine.
Falcon Web Server
The Falcon Web Server is installed and configured during the Docs2Web install process. The install pre-configures the web server to use all local IP Addresses including 127.0.0.1, which is for browsing on the local machine, to use port 6789, so not to interfere with any other web server you may have running on your machine, and set the ISAPI or virtual path for the website to the Docs2Web application path (usually "C:\Program Files\COMvantage\Docs2Manage\Docs2Web\d2w-cgi-bin") along with the right to execute the Docs2Web application.
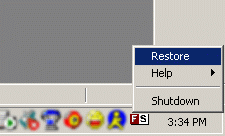
To change the configuration of the Falcon Web Server, start the web server if it is not running. When the server is running, you will either see the "Falcon Web Server" on the task bar like a standard application or in the system tray, usually found in the lower-right corner of the screen near the clock, as a red and white box containing the letters FS as shown below:
To start the Falcon Web Server, click the "Start" (menu) -> "Programs" -> "Docs2Web" -> "Falcon Web Server" -> "Start Falcon Web Server" to load the interface to administer the web server and website. The Falcon Web Server Configuration Dialog will appear:
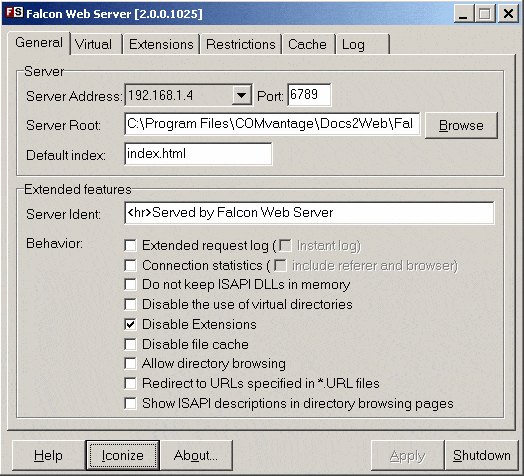
The Falcon Web Server does not allow you to change the IP Address, but does listen to all known IP Addresses. On the General tab (shown above), you will see a drop-down with all the IP Addresses the Falcon Web Server will respond to. However, you can change the port number on this screen. The port number should match the port number in the Website Settings in the Configure Docs2Web program.
To edit the ISAPI Virtual Path go to the "Virtual" tab as shown below:
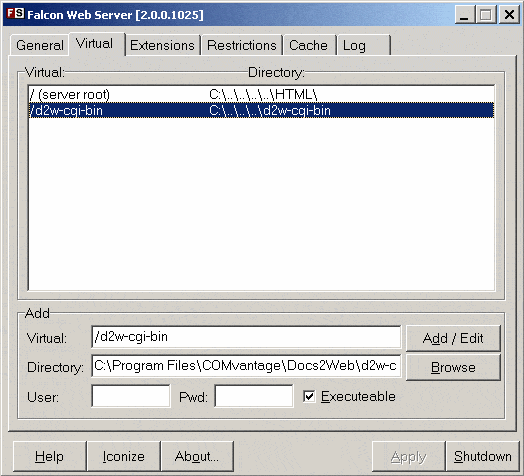
Click to highlight the ISAPI Path if it is already listed in the window. If not, type the name of the desired virtual path in the "Virtual:" field. The virtual path setting should match the DLL Path (or EXE Path for CGI version) setting in the Website Settings, but should also include a "/" character. Next, click the "Browse" and select the Docs2Web application path (usually "C:\Program Files\COMvantage\Docs2Manage\Docs2Web\d2w-cgi-bin"). This should match the directory name of the Docs2Web Application Location less the .dll or .exe filename. Also, check the "Executeable" (Executable) checkbox so the Falcon Web Server knows to execute all Docs2Web applications in that directory. Finally, click the "Add / Edit" button to save the changes or to add the new virtual directory.
To control who can access the Docs2Web application, the Falcon Web Server allows you to restrict the IP Addresses that can access the web server on the "Restrictions" tab as shown below:
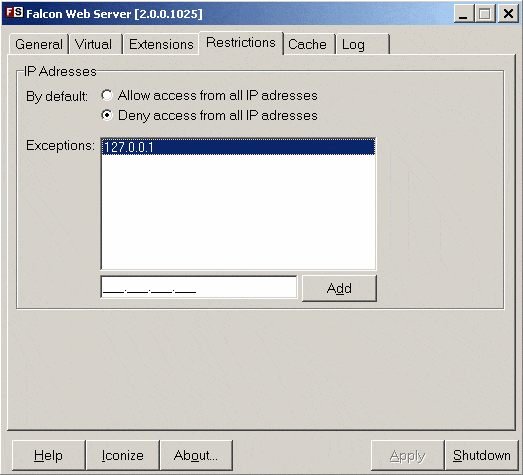
By default, the Docs2Web install configures the web server to restrict all IP Addresses besides the localhost IP Address of 127.0.0.1. To remove this restriction, highlight the address and press the delete key. Add other IP Address restriction in this section.
Once all changes have been made, click the "Apply" button, click "Shutdown" the web server, and start the web server as indicated above.
Click the "Iconize" button to have Falcon Web Server run as a small icon in the system tray only.
NOTE: The Falcon Web Server is not compatible with Windows Vista. However, Docs2Web can be installed on other available web servers that support ISAPI on Vista. Some versions of Vista include a web server which should allow the use of Docs2Web.
Microsoft IIS Web Servers
For more detailed instructions, please refer to the documentation that comes with IIS about installing an ISAPI Application or extension. Here are some general directions for IIS:
1) Load the Internet Information Services console and create or edit a website that will host the Docs2Web application that matches the Website Settings in the Configure Docs2Web program. Only the "Read" right is necessary. DO NOT SELECT THE "WRITE" RIGHT.
2) Right-click the website and choose properties from the pop-up menu.
3) Next select the "Directory Security" tab and click the "Edit" button in the Anonymous Access section.
4) Make sure "Anonymous access" is check, since Docs2Web will control the user authentication.
5) For the User Name field, click the Browse button and select a user that is in the "Administrators" group or use the "Administrator" user.
6) Uncheck the "Allow IIS to control password" and type in that corresponding user's password.
7) Start the "World Wide Web Publishing" service if it is not running and test if the site is accessible.
8) In IIS version 6 and higher, Add a Web Service Extension entry in the Internet Information Services console containing the full pathname to this DLL and enable the application extension.
9) Place the DLL in a virtual directory that matches the DLL Path in the Configure Docs2Web program and make sure "Scripts and Executables" permission turned "on" for that directory.
10) Finally, test the website. Please see the Troubleshooting section if you encounter any difficulties or contact Docs2Manage support.
OmniSecure Web Server
To configure the OmniSecure web server, first shut down the web server if it is running. If the server is running, you will see a blue circle with a lightning bolt in the system tray usually found in the lower-right corner of the screen near the clock as shown below:
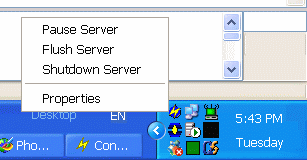
To stop the OmniSecure web server, right-click the icon in the system tray and select "Shutdown Server" from the pop-up menu.
Next, click the "Start" (menu) -> "Programs" -> "OmniSecure" -> "OmniSecure 3.0 Administration" to load the interface to administer the web server and website. The OmniSecure Main Configuration Screen will appear:
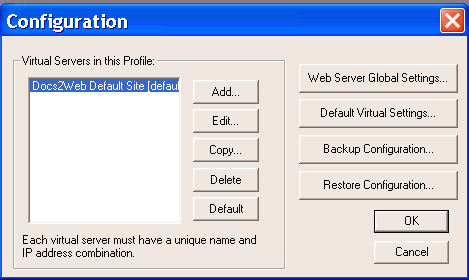
To change the IP Address or the ISAPI Virtual Path, click the "Docs2Web Default Site" and click the edit button.
To edit the IP Address, go to "Server" tab as shown below:
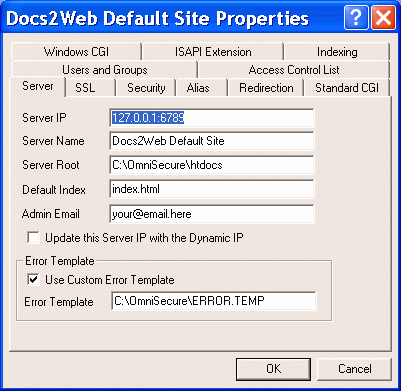
To change the Server IP address to control whether the website is only to be seen on the local computer, intranet, or Internet. If using a registered domain name, enter the IP Address of that domain name to used for the Docs2Web website. This setting should correspond to the HTTP path in the Website Settings, but the setting needs to only be the IP Address. Do not include the "http://" or port information.
To edit the ISAPI Virtual Path go to the "ISAPI Extension" tab as shown below:
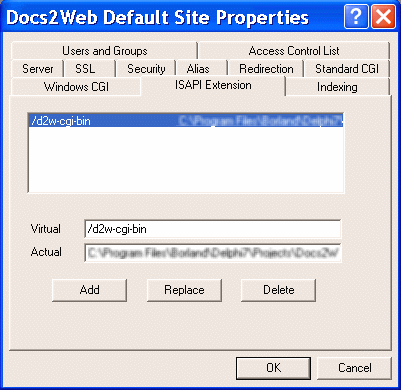
Click to highlight the ISAPI Path to be modified and click "Edit" or click "Add" to create a new one. The virtual path setting should match the DLL (or EXE for CGI) Path setting in the Website Settings, but should also include a "/" character. The Actual (disk location) should point to the Docs2Web application path (usually "C:\Program Files\COMvantage\Docs2Manage\Docs2Web\d2w-cgi-bin"). This should match the directory name of the Docs2Web Application Location less the .dll or .exe filename.
To edit the web server's port setting, click the "Web Server Global Settings..." button. Under the "Network" tab you will see the "Port" and "Secure Port" fields. Docs2Web comes pre-configured to uses 6789 for the Port setting. This avoids any conflicts with other web servers that maybe installed on that system. This setting should correspond to the port portion that follows the IP Address or domain name in the HTTP Path field in the Website Settings. If no port is specified in the HTTP Path field then port 80 should be used in the Port field in OmniSecure.
The Secure port should always remain port 443, but if is changed it should correspond with the port used in the HTTPS Path field in the Website Settings. If no port is specified in the HTTPS Path field, port 443 should be used in the Port field in OmniSecure.


